

How to Customize String Theme and Localization in QuickBlox iOS UI Kit
Customize your chat app to any language with QuickBlox UI Kit

The QuickBlox iOS Chat UI Kit is an exceptional tool for iOS developers looking to create convenient and intuitive chat functionality. The Kit offers a set of iOS chat customizations that make it easy to integrate chat functionality into your app and allow you to customize the look and feel. Furthermore, the UI Kit can be customized to suit your specific needs.
Previously we showed you how to get started with the UI Kit and how to change the color theme. In this latest blog, we’ll show you how to customize string themes and localization within the UI Kit. String constants are essential for supporting multiple languages and cultural variations in applications. Developers can customize string constants to display content in different languages, making their applications accessible to a global audience. By working through the steps in this tutorial, you’ll be able to provide versions of your app that are tailored to specific languages and regions.
Learn more about Getting Started with the QuickBlox iOS UI Kit
Learn more about How to Customize Color Theme and Settings in QuickBlox iOS UI Kit
String Constant Theme in QuickBlox UI Kit
The QuickBlox iOS UI Kit contains a default string theme consisting of string constants necessary for a correct and user-friendly application interface and functionality.
The default StringTheme conforms to the ThemeStringProtocol:
public class ThemeString: ThemeStringProtocol {
    public var dialogsEmpty: String = String(localized: "dialog.items.empty", bundle: .module)
    public var usersEmpty: String = String(localized: "dialog.members.empty", bundle: .module)
    public var messegesEmpty: String = String(localized: "dialog.messages.empty", bundle: .module)

    public var privateDialog: String = String(localized: "dialog.type.private", bundle: .module)
    public var groupDialog: String = String(localized: "dialog.type.group", bundle: .module)
    public var publicDialog: String = String(localized: "dialog.type.group", bundle: .module)

    public var typingOne: String = String(localized: "dialog.typing.one", bundle: .module)
    public var typingTwo: String = String(localized: "dialog.typing.two", bundle: .module)
    public var typingFour: String = String(localized: "dialog.typing.four", bundle: .module)

    public var enterName: String = String(localized: "alert.actions.enterName", bundle: .module)
    public var nameHint: String = String(localized: "dialog.name.hint", bundle: .module)
    public var create: String = String(localized: "dialog.name.create", bundle: .module)
    public var next: String = String(localized: "dialog.name.next", bundle: .module)
    public var search: String = String(localized: "dialog.name.search", bundle: .module)
    public var edit: String = String(localized: "dialog.info.edit", bundle: .module)
    public var members: String = String(localized: "dialog.info.members", bundle: .module)
    public var notification: String = String(localized: "dialog.info.notification", bundle: .module)
    public var searchInDialog: String = String(localized: "dialog.info.searchInDialog", bundle: .module)
    public var leaveDialog: String = String(localized: "dialog.info.leaveDialog", bundle: .module)

    public var you: String = String(localized: "dialog.info.you", bundle: .module)
    public var admin: String = String(localized: "dialog.info.admin", bundle: .module)
    public var typeMessage: String = String(localized: "dialog.action.typeMessage", bundle: .module)

    public var dialogs: String = String(localized: "screen.title.dialogs", bundle: .module)
    public var dialog: String = String(localized: "screen.title.dialog", bundle: .module)
    public var dialogType: String = String(localized: "screen.title.dialogType", bundle: .module)
    public var newDialog: String = String(localized: "screen.title.newDialog", bundle: .module)
    public var createDialog: String = String(localized: "screen.title.createDialog", bundle: .module)
    public var addMembers: String = String(localized: "screen.title.addMembers", bundle: .module)
    public var dialogInformation: String = String(localized: "screen.title.dialogInformation", bundle: .module)

    public var add: String = String(localized: "alert.actions.add", bundle: .module)
    public var dialogName: String = String(localized: "alert.actions.dialogName", bundle: .module)
    public var changeImage: String = String(localized: "alert.actions.changeImage", bundle: .module)
    public var changeDialogName: String = String(localized: "alert.actions.changeDialogName", bundle: .module)

    public var photo: String = String(localized: "alert.actions.photo", bundle: .module)
    public var removePhoto: String = String(localized: "alert.actions.removePhoto", bundle: .module)
    public var camera: String = String(localized: "alert.actions.camera", bundle: .module)
    public var gallery: String = String(localized: "alert.actions.gallery", bundle: .module)
    public var file: String = String(localized: "alert.actions.file", bundle: .module)

    public var remove: String = String(localized: "alert.actions.remove", bundle: .module)
    public var cancel: String = String(localized: "alert.actions.cancel", bundle: .module)
    public var ok: String = String(localized: "alert.actions.ok", bundle: .module)
    public var removeUser: String = String(localized: "alert.message.removeUser", bundle: .module)
    public var questionMark: String = String(localized: "alert.message.questionMark", bundle: .module)
    public var errorValidation: String = String(localized: "alert.message.errorValidation", bundle: .module)
    public var addUser: String = String(localized: "alert.message.addUser", bundle: .module)
    public var toDialog: String = String(localized: "alert.message.toDialog", bundle: .module)
    public var noResults: String = String(localized: "alert.message.noResults", bundle: .module)
    public var noMembers: String = String(localized: "alert.message.noMembers", bundle: .module)
    public var invalidAI: String = String(localized: "alert.message.invalidAI", bundle: .module)

    public var maxSize: String = String(localized: "attachment.maxSize.title", bundle: .module)
    public var maxSizeHint: String = String(localized: "attachment.maxSize.hint", bundle: .module)
    public var fileTitle: String  = String(localized: "attachment.title.file", bundle: .module)
    public var gif: String = String(localized: "attachment.title.gif", bundle: .module)

    public init() {}
}
By default, the QuickBlox iOS UI Kit supports English localization:
import PackageDescription

let package = Package(

    name: "QuickBloxUIKit",

    defaultLocalization: "en",

    platforms: [

        .iOS(.v15)

    ],
with such default strings:
"dialog.items.empty" = "There are no dialogs";

"dialog.members.empty" = "You don’t have any users.";

"dialog.messages.empty" = "You don’t have any messages.";

"dialog.type.private" = "Private";

"dialog.type.group" = "Group";

"dialog.type.public" = "Public";

"dialog.typing.one" = " is typing...";

"dialog.typing.two" = " are typing...";

"dialog.typing.four" = " and 2 others are typing...";

"dialog.name.hint" = "Use alphanumeric characters and spaces in a range from 3 to 60. Cannot contain more than one space in a row.";

"dialog.name.create" = "Create";

"dialog.name.next" = "Next";

"dialog.name.search" = "Search";

"dialog.name.cancel" = "Cancel";

"dialog.info.edit" = "Edit";

"dialog.info.members" = "Members";

"dialog.info.notification" = "Notification";

"dialog.info.searchInDialog" = "Search in dialog";

"dialog.info.leaveDialog" = "Leave dialog";

"dialog.info.you" = " (You)";

"dialog.info.admin" = "Admin";

"dialog.action.typeMessage" = "Type message";

"screen.title.dialogs" = "Dialogs";

"screen.title.dialog" = "Dialog";

"screen.title.dialogType" = "Dialog type";

"screen.title.newDialog" = "New Dialog";

"screen.title.createDialog" = "Create Dialog";

"screen.title.addMembers" = "Add Members";

"screen.title.dialogInformation" = "Dialog information";

"alert.actions.add" = "Add";

"alert.actions.dialogName" = "Dialog name";

"alert.actions.enterName" = "Enter name";

"alert.actions.changeImage" = "Change image";

"alert.actions.changeDialogName" = "Change dialog name";

"alert.actions.photo" = "Photo";

"alert.actions.removePhoto" = "Remove photo";

"alert.actions.camera" = "Camera";

"alert.actions.gallery" = "Gallery";

"alert.actions.file" = "File";

"alert.actions.remove" = "Remove";

"alert.actions.cancel" = "Cancel";

"alert.actions.ok" = "Ok";

"alert.message.removeUser" = "Are you sure you want to remove ";

"alert.message.questionMark" = "?";

"alert.message.errorValidation" = "Error Validation";

"alert.message.addUser" = "Are you sure you want to add ";

"alert.message.toDialog" = " to this dialog?";

"alert.message.noResults" = "No results found";

"alert.message.noMembers" = "There are no members";

"alert.message.invalidAI" = "The [AI Assist Answer feature](https://docs.quickblox.com/docs/ios-uikit-ai-features#assist-answer) is currently not configured. To enable this functionality, you must set either the .openAIAPIKey or .proxyServerURLPath properties for QuickBloxUIKit.feature.ai.assistAnswer. To disable the feature, simply set QuickBloxUIKit.feature.ai.assistAnswer.enable = false.";

"attachment.maxSize.title" = "The uploaded file exceeds maximum file size (10MB)";

"attachment.maxSize.hint" = "Please select a smaller attachment.";

"attachment.title.file" = "file";

"attachment.title.gif" = "GIF";
Customizing the String Constant Theme
First Steps
- QuickBlox iOS UI Kit Sample
We recommend that you download our UI Kit Sample. In this sample, we've implemented the string constant theme customization steps and provided additional application localization examples. This sample already has a QuickBlox iOS UI Kit connected as a Swift Package.
- QuickBlox Developer Account
To start interacting with QuickBlox, you need to create an application using the QuickBlox admin panel. For more details on how to do this, read our previous blog, How to Create an App and Use the QuickBlox Admin Panel.
Fill in the required fields with the secret keys of this application to initialize the QuickBlox SDK.
In the UI Kit Sample, go to the Connect class and fill in the appropriate fields:
- Create your own iOS SwiftUI Project
If you want to create your new iOS SwiftUI project with Xcode you can read our earlier blog: Getting Started with the QuickBlox iOS UI Kit. This guide will walk you through the process of setting up and accessing your App credentials in the QuickBlox Admin Panel, which you will need in Step 3 of this guide.
class Connect: ObservableObject {
    @Published var state: ConnectState = .waiting

    init(state: ConnectState = .disconnected) {
        self.state = state
        Quickblox.initWithApplicationId(0, // Your_Application_ID
                                        authKey: "", // Your_Authorization_Key
                                        authSecret: "", // Your_Authorization_Secret
                                        accountKey: "") // Your_Account_Key


        QBSettings.carbonsEnabled = true
        QBSettings.autoReconnectEnabled = true
    }
    ...
}
Let’s Start Customizing!
Great! Now you’re ready to start customizing your string constant theme!
If you are already using localization in your project, then you just need to add string constants from QuickBlox iOS UI Kit to the English localization file of your project.
If you are not yet using localization in your project, then it will be useful for you to familiarize yourself with this functionality from the Apple Documentation.
Let's step-by-step prepare our project for customizing QuickBlox iOS UI Kit's string constants and their Localization.
For this tutorial, we'll look at an app with an English user interface and then localize the app to other languages, such as Spanish.
Make sure you have the "Use basic internationalization" checkbox checked.
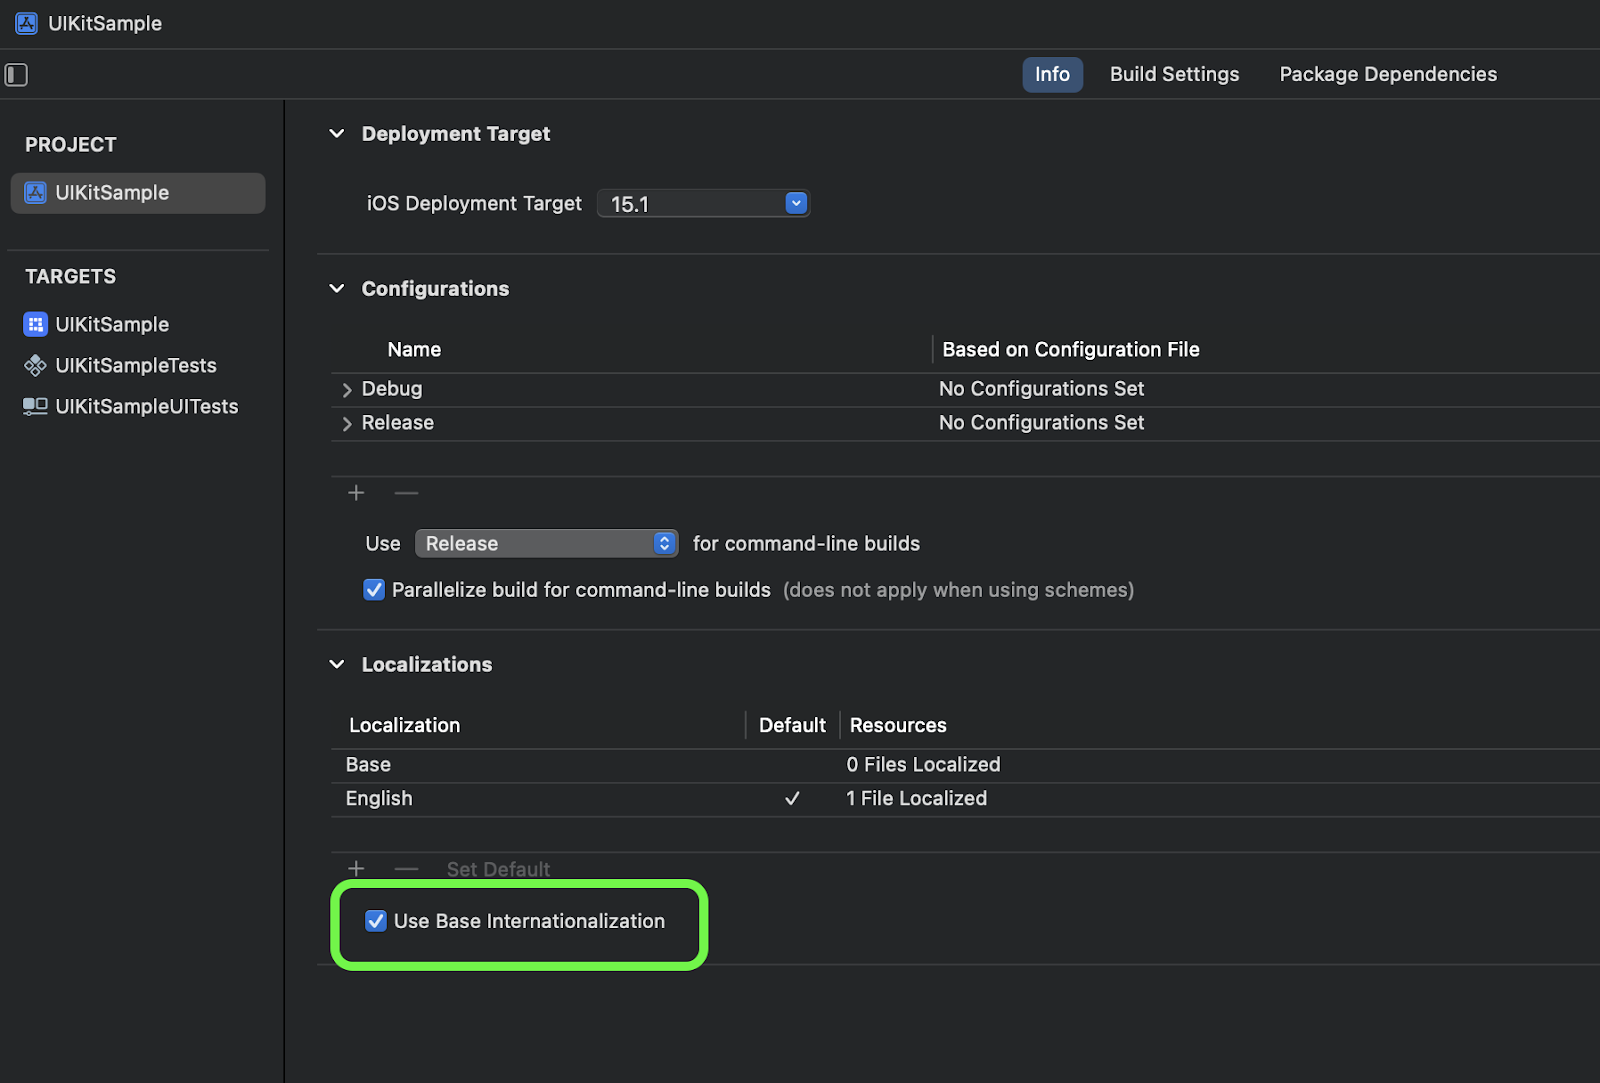
When you create a new project, Xcode automatically generates the resources and file structure, including them, for the default language, usually English.
Let's copy QuickBlox iOS UI Kit's string constants and paste them into the English localization file of the application.

Use your own String Theme
You can use your string values to uniquely design your application. For example, let's rename "Dialog" to "Channel":
"dialog.items.empty" = "You don’t have any channels.";
"dialog.members.empty" = "You don’t have any users.";
"dialog.messages.empty" = "You don’t have any messages.";
"dialog.type.private" = "Private";
"dialog.type.group" = "Group";
"dialog.type.public" = "Public";
"dialog.typing.one" = " is typing...";
"dialog.typing.two" = " are typing...";
"dialog.typing.four" = " and 2 others are typing...";
"dialog.name.hint" = "Use alphanumeric characters and spaces in a range from 3 to 60. Cannot contain more than one space in a row.";
"dialog.name.create" = "Create";
"dialog.name.next" = "Next";
"dialog.name.search" = "Search";
"dialog.name.cancel" = "Cancel";
"dialog.info.edit" = "Edit";
"dialog.info.members" = "Members";
"dialog.info.notification" = "Notification";
"dialog.info.searchInDialog" = "Search in channel";
"dialog.info.leaveDialog" = "Leave channel";
"dialog.info.you" = " (You)";
"dialog.info.admin" = "Admin";
"dialog.action.typeMessage" = "Type message";
"screen.title.dialogs" = "Channels";
"screen.title.dialog" = "Channel";
"screen.title.dialogType" = "Channel type";
"screen.title.newDialog" = "New Channel";
"screen.title.createDialog" = "Create Channel";
"screen.title.addMembers" = "Add Members";
"screen.title.dialogInformation" = "Channel information";
"alert.actions.add" = "Add";
"alert.actions.dialogName" = "Channel name";
"alert.actions.enterName" = "Enter name";
"alert.actions.changeImage" = "Change image";
"alert.actions.changeDialogName" = "Change channel name";
"alert.actions.photo" = "Photo";
"alert.actions.removePhoto" = "Remove photo";
"alert.actions.camera" = "Camera";
"alert.actions.gallery" = "Gallery";
"alert.actions.file" = "File";
"alert.actions.remove" = "Remove";
"alert.actions.cancel" = "Cancel";
"alert.actions.ok" = "Ok";
"alert.message.removeUser" = "Are you sure you want to remove ";
"alert.message.questionMark" = "?";
"alert.message.errorValidation" = "Error Validation";
"alert.message.addUser" = "Are you sure you want to add ";
"alert.message.toDialog" = " to this channel?";
"alert.message.noResults" = "No results found";
"alert.message.noMembers" = "There are no members";
"alert.message.invalidAI" = "The [AI Assist Answer feature](https://docs.quickblox.com/docs/ios-uikit-ai-features#assist-answer) is currently not configured. To enable this functionality, you must set either the **.openAIAPIKey** or **.proxyServerURLPath** properties for QuickBloxUIKit.feature.ai.assistAnswer. To disable the feature, simply set QuickBloxUIKit.feature.ai.assistAnswer.enable = false.";
"attachment.maxSize.title" = "The uploaded file exceeds maximum file size (10MB)";
"attachment.maxSize.hint" = "Please select a smaller attachment.";
"attachment.title.file" = "file";
"attachment.title.gif" = "GIF";
Great! Now let's apply these changes.
To do this, you need to create a class that implements QuickBloxUIKit.ThemeStringProtocol:
public class CustomThemeString: ThemeStringProtocol {

    public var dialogsEmpty: String = String(localized: "dialog.items.empty")

    public var usersEmpty: String = String(localized: "dialog.members.empty")

    public var messegesEmpty: String = String(localized: "dialog.messages.empty")

    public var privateDialog: String = String(localized: "dialog.type.private")

    public var groupDialog: String = String(localized: "dialog.type.group")

    public var publicDialog: String = String(localized: "dialog.type.group")

    public var typingOne: String = String(localized: "dialog.typing.one")

    public var typingTwo: String = String(localized: "dialog.typing.two")

    public var typingFour: String = String(localized: "dialog.typing.four")

    public var enterName: String = String(localized: "alert.actions.enterName")

    public var nameHint: String = String(localized: "dialog.name.hint")

    public var create: String = String(localized: "dialog.name.create")

    public var next: String = String(localized: "dialog.name.next")

    public var search: String = String(localized: "dialog.name.search")

    public var edit: String = String(localized: "dialog.info.edit")

    public var members: String = String(localized: "dialog.info.members")

    public var notification: String = String(localized: "dialog.info.notification")

    public var searchInDialog: String = String(localized: "dialog.info.searchInDialog")

    public var leaveDialog: String = String(localized: "dialog.info.leaveDialog")

    public var you: String = String(localized: "dialog.info.you")

    public var admin: String = String(localized: "dialog.info.admin")

    public var typeMessage: String = String(localized: "dialog.action.typeMessage")

    public var dialogs: String = String(localized: "screen.title.dialogs")

    public var dialog: String = String(localized: "screen.title.dialog")

    public var dialogType: String = String(localized: "screen.title.dialogType")

    public var newDialog: String = String(localized: "screen.title.newDialog")

    public var createDialog: String = String(localized: "screen.title.createDialog")

    public var addMembers: String = String(localized: "screen.title.addMembers")

    public var dialogInformation: String = String(localized: "screen.title.dialogInformation")

    public var add: String = String(localized: "alert.actions.add")

    public var dialogName: String = String(localized: "alert.actions.dialogName")

    public var changeImage: String = String(localized: "alert.actions.changeImage")

    public var changeDialogName: String = String(localized: "alert.actions.changeDialogName")

    public var photo: String = String(localized: "alert.actions.photo")

    public var removePhoto: String = String(localized: "alert.actions.removePhoto")

    public var camera: String = String(localized: "alert.actions.camera")

    public var gallery: String = String(localized: "alert.actions.gallery")

    public var file: String = String(localized: "alert.actions.file")

    public var remove: String = String(localized: "alert.actions.remove")

    public var cancel: String = String(localized: "alert.actions.cancel")

    public var ok: String = String(localized: "alert.actions.ok")

    public var removeUser: String = String(localized: "alert.message.removeUser")

    public var questionMark: String = String(localized: "alert.message.questionMark")

    public var errorValidation: String = String(localized: "alert.message.errorValidation")

    public var addUser: String = String(localized: "alert.message.addUser")

    public var toDialog: String = String(localized: "alert.message.toDialog")

    public var noResults: String = String(localized: "alert.message.noResults")

    public var noMembers: String = String(localized: "alert.message.noMembers")

    public var invalidAI: String = String(localized: "alert.message.invalidAI")

    public var maxSize: String = String(localized: "attachment.maxSize.title")

    public var maxSizeHint: String = String(localized: "attachment.maxSize.hint")

    public var fileTitle: String  = String(localized: "attachment.title.file")

    public var gif: String = String(localized: "attachment.title.gif")

    public init() {}

}
Let's create a class for customizing all the themes of the QuickBlox iOS UI Kit, including the Themes of String Constants.
class AppTheme: ThemeProtocol, ObservableObject {

    @Published var color: ThemeColorProtocol

    @Published var font: ThemeFontProtocol

    @Published var image: ThemeImageProtocol

    @Published var string: ThemeStringProtocol


    init(color: ThemeColorProtocol,

         font: ThemeFontProtocol,

         image: ThemeImageProtocol,

         string: ThemeStringProtocol) {

        self.color = color

        self.font = font

        self.image = image

        self.string = string

    }

}
Set this up and apply your theme in a convenient place in your application, for example at the QuickBlox iOS UI Kit entry point:
var appTheme: AppTheme = AppTheme(color: CustomThemeColor(), font: QuickBloxUIKit.ThemeFont(), image: QuickBloxUIKit.ThemeImage(), string: CustomThemeString())

QuickBloxUIKit.settings.theme = appTheme // Custom color and string themes setting.
Your string values will apply to the QuickBlox iOS UI Kit UI:

This is what we wanted! It's time to use localization to empower your application.
For custom localization, customize the application by adding the necessary localization files. You can learn more about how to do this in the Apple documentation.
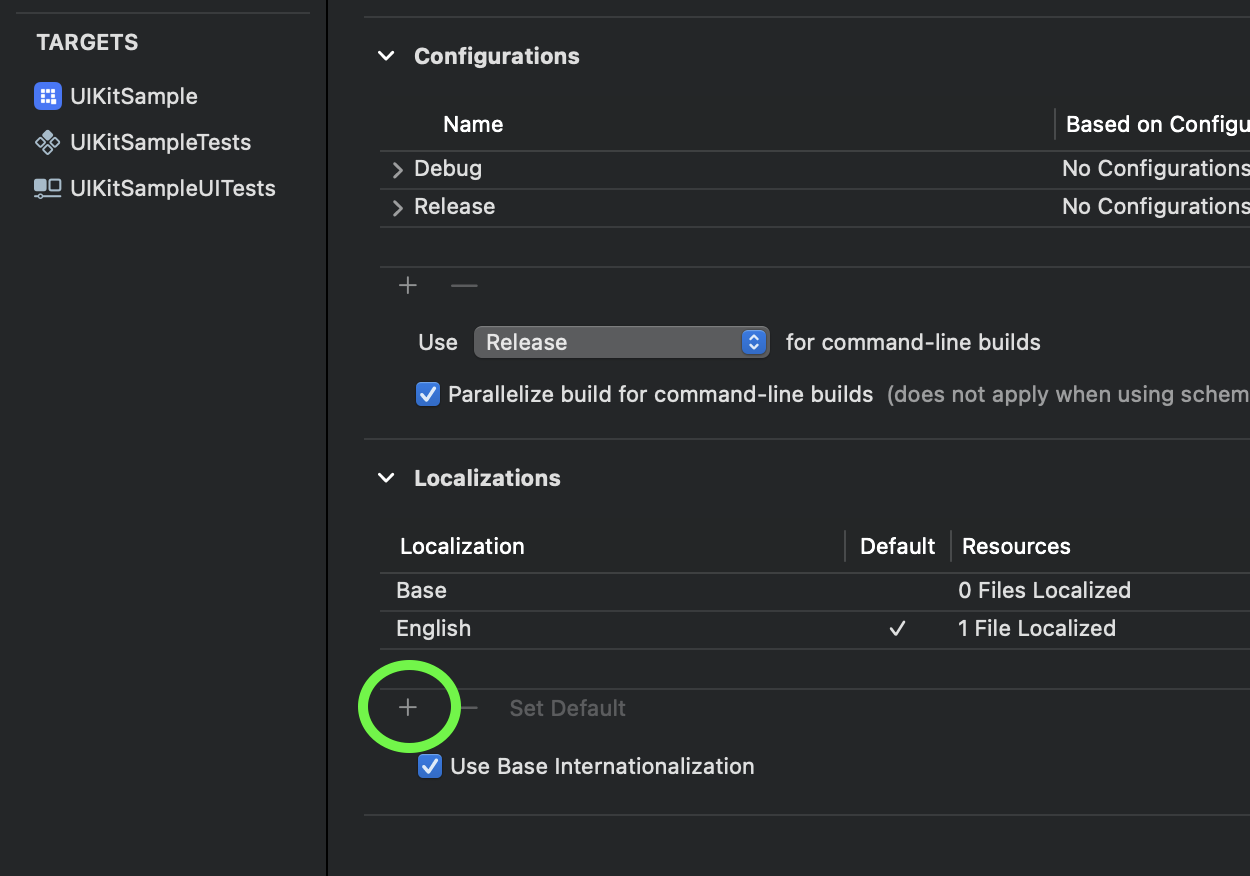
Add a localization file for Spanish to the project. To do this, click on the plus:
and select Spanish from the drop-down menu:
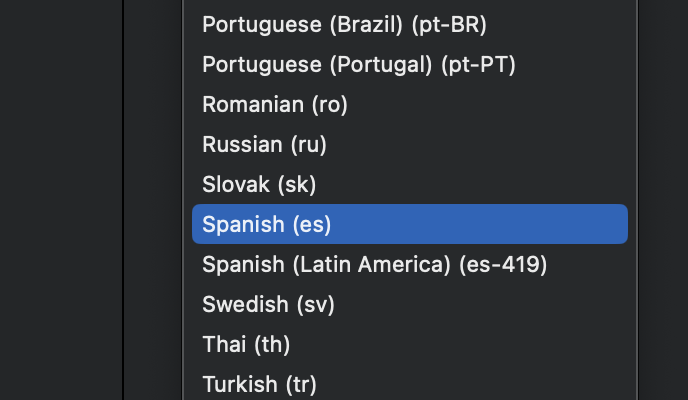
and XCode will create will add this file to your project:
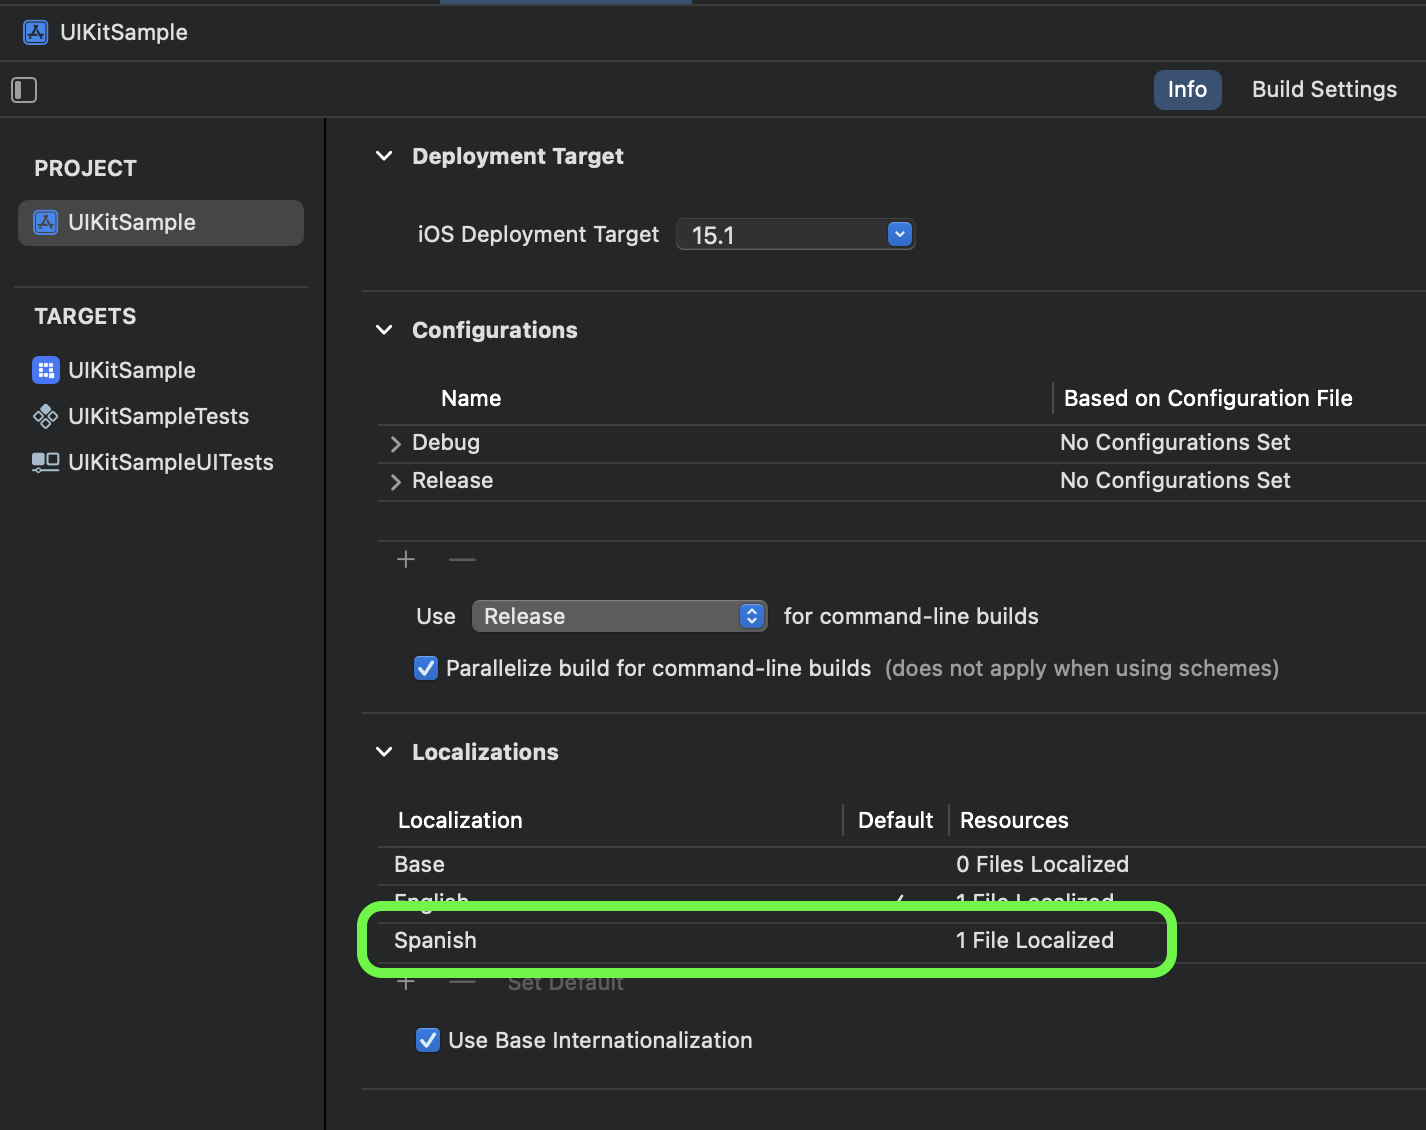
The Spanish localization file is currently empty:

Let's fill it in! To do this, you need to translate the values of string constants from English into Spanish in any way you like.
I received this translation:
"dialog.items.empty" = "No tiene ningún cuadro de canal.";

"dialog.members.empty" = "No tiene ningún usuario.";

"dialog.messages.empty" = "No tiene ningún mensaje.";

"dialog.type.private" = "Privado";

"dialog.type.group" = "Grupo";

"dialog.type.public" = "Público";

"dialog.typing.one" = " está escribiendo...";

"dialog.typing.two" = " están escribiendo...";

"dialog.typing.four" = " y otros 2 están escribiendo...";

"dialog.name.hint" = "Use caracteres alfanuméricos y espacios en un rango de 3 a 60. No puede contener más de un espacio en una fila.";

"dialog.name.create" = "Crear";

"dialog.name.next" = "Siguiente";

"dialog.name.search" = "Buscar";

"dialog.name.cancel" = "Cancelar";

"dialog.info.edit" = "Editar";

"dialog.info.members" = "Miembros";

"dialog.info.notification" = "Notificación";

"dialog.info.searchInDialog" = "Buscar en canal";

"dialog.info.leaveDialog" = "Salir del cuadro de canal";

"dialog.info.you" = " (usted)";

"dialog.info.admin" = "Admin";

"dialog.action.typeMessage" = "Escribir mensaje";

"screen.title.dialogs" = "Canales";

"screen.title.dialog" = "Canal";

"screen.title.dialogType" = "Tipo de canal";

"screen.title.newDialog" = "Canal nuevo";

"screen.title.createDialog" = "Crear canal";

"screen.title.addMembers" = "Agregar miembros";

"screen.title.dialogInformation" = "Información de canal";

"alert.actions.add" = "Agregar";

"alert.actions.dialogName" = "Nombre del canal";

"alert.actions.enterName" = "Ingrese el nombre";

"alert.actions.changeImage" = "Cambiar imagen";

"alert.actions.changeDialogName" = "Cambiar nombre de canal";

"alert.actions.photo" = "Foto";

"alert.actions.removePhoto" = "Eliminar foto";

"alert.actions.camera" = "Cámara";

"alert.actions.gallery" = "Galería";

"alert.actions.file" = "Archivo";

"alert.actions.remove" = "Eliminar";

"alert.actions.cancel" = "Cancelar";

"alert.actions.ok" = "Ok";

"alert.message.removeUser" = "¿Está seguro de que desea eliminar ";

"alert.message.questionMark" = "?";

"alert.message.errorValidation" = "Error de validación";

"alert.message.addUser" = "¿Está seguro de que desea agregar ";

"alert.message.toDialog" = "¿a este cuadro de canal?";

"alert.message.noResults" = "No results found";

"alert.message.noMembers" = "There are no members";

"alert.message.invalidAI" = "La [función AI Assist Answer](https://docs.quickblox.com/docs/ios-uikit-ai-features#assist-answer) no está configurada actualmente. Para habilitar esta función, debe configurar  Propiedades .openAIAPIKey o .proxyServerURLPath para QuickBloxUIKit.feature.ai.assistAnswer. Para deshabilitar la función, simplemente establezca QuickBloxUIKit.feature.ai.assistAnswer.enable = false.";

"attachment.maxSize.title" = "El archivo cargado supera el tamaño máximo de archivo (10 MB)";

"attachment.maxSize.hint" = "Seleccione un archivo adjunto más pequeño.";

"attachment.title.file" = "archivo";

"attachment.title.gif" = "GIF";
I urge you not to completely rely on translation tools and be sure to ask a native speaker to review your application before the release to avoid embarrassment!
Now if Spanish is set as the main language on the device of the user of your application, then your application will automatically respond to this and the user interface will change:

Fabulous! Now you can localize your app to the languages and regions you need.
Wrapping up
As you conclude this journey into customizing string themes and achieving seamless localization with the QuickBlox iOS UI Kit, you now possess a powerful set of tools to take your app's user experience to new heights. By harnessing the kit's capabilities, you can effortlessly ensure a user-friendly interface for users around the world. Remember, the ability to adapt to diverse cultures and languages is a hallmark of successful apps in today's global landscape.
Look out for our next blog where we delve into customizing fonts and images for a more personalized look.
Happy coding!
Talk to Us
We are actively expanding the functionality of our UI Kits by adding new features, fixing bugs, and optimizing performance and stability.
We appreciate your feedback regarding additional features needed for your projects. If you have any questions regarding the integration of the UI Kit into your application or its settings, feel free to contact the developers via GitHub or Discord.


